
It’s not exactly a secret that I’m a big Harry Potter fan, I’ll admit that it took me a while to actually read the books but once I did, I was hooked! It’s a story that has so much visual goodness that it’s easy to get inspiration from it and create art based on it’s characters, words, and themes. Back in July when the final movie was being released I did a few photos based around the books/movies and one of my favourites was one based around the Patronus Charm mentioned in the books.

Patronus Charm: “Conjures an incarnation of the caster’s innermost positive feelings, such as joy or hope, known as a Patronus. A Patronus is conjured as a protector, and is a weapon rather than a predator of souls: Patronuses shield their conjurors from Dementors or Lethifolds, and can even drive them away.”
When I was coming up with a list of tutorials I’d like to do on my blog, the patronus tutorial was one that jumped right to the top. Last week I wanted to work on the image and thankfully my dear friend Sabby agreed to my model! Hopefully the tutorial is easy to understand, I’d LOVE to see you guys create your own Patronus images 🙂
Step 1 (optional) –
I’m starting from the very beginning of the photo, this is the “bare” image straight out of the camera. Because I used a fixed focus lens, I always expand my frame which essentially means that I take the main photo you see here, and then change my focus to manual and then take about 20 photos of the background. Then in photoshop, I expand the canvas size (for some reason 300cmx300cm is my number, and then add each photo onto a new layer and work at getting them all to match up. You don’t have to worry about this step, but I thought I’d start from the very beginning.
you can click on the images to make them bigger 🙂

^—– before expansion

^——- after expansion
Step 2 (Flying Scarf)
This is another optional part, but I think it adds a bit of dramatic flair to the final image. While taking the main photo of Sabby, I also took another one of her scarf in the air, just by using my timer and flipping the scarf up to catch it flying. Then I just added the scarf on as new layer and matched it as closely as I could to the original photo.

Step 4 (Light)
This is where the fun part comes in, and the part that you can start to be creative. To achieve the “bright light” that a patronus charm would give off, I use a series of “fractal brushes” from deviant art (link below). The brushes are used on a new layer with screen as the blending mode. I use a light bluish green tone, but really you could any vivid colour, play with what looks best for you. Same with the brushes, you can use a variety of different brushes to get different effects.
In this layer, I also added a dark gradient (add a new fill layer and set it to radial gradient and then to forground to transparent mode). Then you just drag and click to add the gradient to the part of the image you’d like to be a little darker, for this type of image I usually like to make the outer part of the photo quite dark to highlight the lightness of the spell. Play around with this step and you can create neat effects.

Step 5 (Adding your patronus)
This is another creative part! Sabby chose (well, actually I chose based on our conversation) to have a white horse be the animal that is coming out of her wand. Once you choose your animal, locate a silhouette image of that animal. Add it into your image on a new layer. Invert the image so that the animal is now white (CTRL-I) and then get rid of the black (I use the magic brush and delete). Then duplicate this layer and blur the duplicate using a Gaussian blur, you dont’ want a large blur but enough that it takes away the rough edge of the silhouette.

Step 6 (Fancy Stuff)
Now, duplicate your animal layer again and this time colour it in (paint bucket is fine) with the same hue as your lights/brushes from step 4. You should have a blue/green animal. Set the blending mode to screen and blur this layer to give the silhouette a coloured-hue around it. As you did in step 4, play with different brushes (on screen mode and using a bright colour) and try new things. I like to give off little trails of light so I use brushes that give that effect. You can find links to all the brushes I used at the bottom of the post. I usually end up applying a soft blur to this layer as well just to get rid of any harsh lines.

Step 7 (Final Touches)
Now that you have the hard part out of the way, it’s time to have some more fun. It looks like a big jump from the last image to this one but it’s really only a few small steps. First a couple of radial gradents, the first was that same blue/green colour that should match your other colours from the last steps, I use this just to create a nice radial blur of colour, set this layer to screen mode and have the gradient positioned over the wand/brush/animal . Then I add another radial gradient set to muplitply mode and with a darker tone, this radial gradient should cast a darker tone over everything but the wand/brush/animal. Blur both these layers.

In my image I played with the curves, levels and colour tones of the image but you don’t have to do this if you don’t want to. It’s interesting to use the colour balance tool to give everything an even hue but you certainly don’t need to do this. I also added some cloud textures to enhance the sky, but again not necessary. To add another dimension to the sky I painted over the clouds with a pink brush set to “soft light” and on a low opacity just to give it some colour.
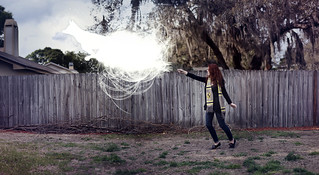
Final Image:

Resources!
Fractal Brush
Sparkle Brush

^_^ nice tutorial)
very nice to see how create a patronus. i was waiting for this tutorial since that days i asked you for some… i’m gonna try and do it next weekend. thanks joel!
Yay been hoping someone uploads a tutorial for a pratonus, awesome tutorial thank you 🙂
Hi Joel,
I have a question in general, Im starting to get the hang of PS and I’ve always wondered why -when I see tutorials- is it so important to use multiple layers. It’d be very nice if you could answer.
You’re truly an inspiration! 🙂
Thanks and Happy New Year!
Hi!
Great question, the reason that layers are so useful is that it allows you to edit single parts of your image rather than the entire image itself. If you want to only modify the colours of one part, you can do that through layers and if you make a mistake it’s easier to fix than if you were doing everything as one image.
Hopefully that helps!
I see, it definitely helped (:
Thank you!
Thanks for the tutorial. Looking forward to more!
Joel – you rock!
And not by a little – you rock a lot!!!!
I saw your retweet on Coca Cola – freakin awesome! I was telling Harold that it is a good thing I’m not trying to live up to you. He replied that if I delivered a baby in a car solved world hunger I’d get close. LOL
Anyway, your tutorial got me to thinking about guardian spirits in general and it occurred to me that nature could use a Patronus! So took one my my plant pictures and made a Dragon Patronus for it.
I hope you like : )
Dragon Plant Patronus
I’ve quietly followed your Flickr stream for two years or so, and am still just as much in awe of your work as I was the first day I discovered your stream. Your pictures never disappoint. I am so happy you’re sharing with all of us the technical aspects of how you create your images, and not hoarding your “secrets.”
I absolutely had to give this a try and this was my result =)
I hope you like it! =)
Apparently I fail at leaving links in comments. Take 2?
joel!! this is a fantastic tutorial! i think i remember you mentioning in the past you use the Brenizer method, and you made it so much easier to understand than Brenizer did himself. (or maybe it was just me, but seeing it in steps was better for me to get it).
love this photo, and more points of love for it b/c of harry potter 🙂
you rock thanks for sharing!!! 😉
Thank you for sharing this tutorial with us, a nice gift full of generosity like a patronus! 🙂
Thanks for making tutorials for your stunning photos. I am glad that I read this one because I always wonder how you expand your photos in “Step 1 (optional)”. I use a 50mm lens and its frame is not wide. Would you please write a tutorial about the photo expansion, I am very grateful to you.
You actually make it seem really easy along with your presentation but I find this topic to be actually something which I think I would by no means understand. It sort of feels too complicated and very huge for me. I am taking a look forward on your next publish, I will attempt to get the grasp of it!
Awesome presentation. I do have a question. I am using Photoshop Elements 10. I downloaded the 2 brush sets mentioned on your page. How do i upload them to Photoshop?
Thanks.
Always great to stumble across a new blog this excellent!
I will be coming back here for certain.
Hey Joel! I tried this out and I really like it.
I used your expansion tuturial as well.
If you want to see here’s the link:
Thanks for the tutorial! 🙂
I’ll try it ^^